Introduction
Overview
LLSpy is a python library to facilitate lattice light sheet data processing. It extends the cudaDeconv binary created in the Betzig lab at Janelia Research Campus, adding features that auto-detect experimental parameters from the data folder structure and metadata (minimizing user input), auto-choose OTFs, perform image corrections and manipulations, and facilitate file handling. Full(er) documentation available at http://llspy.readthedocs.io/
There are three ways to use LLSpy:
1. Graphical User Interface
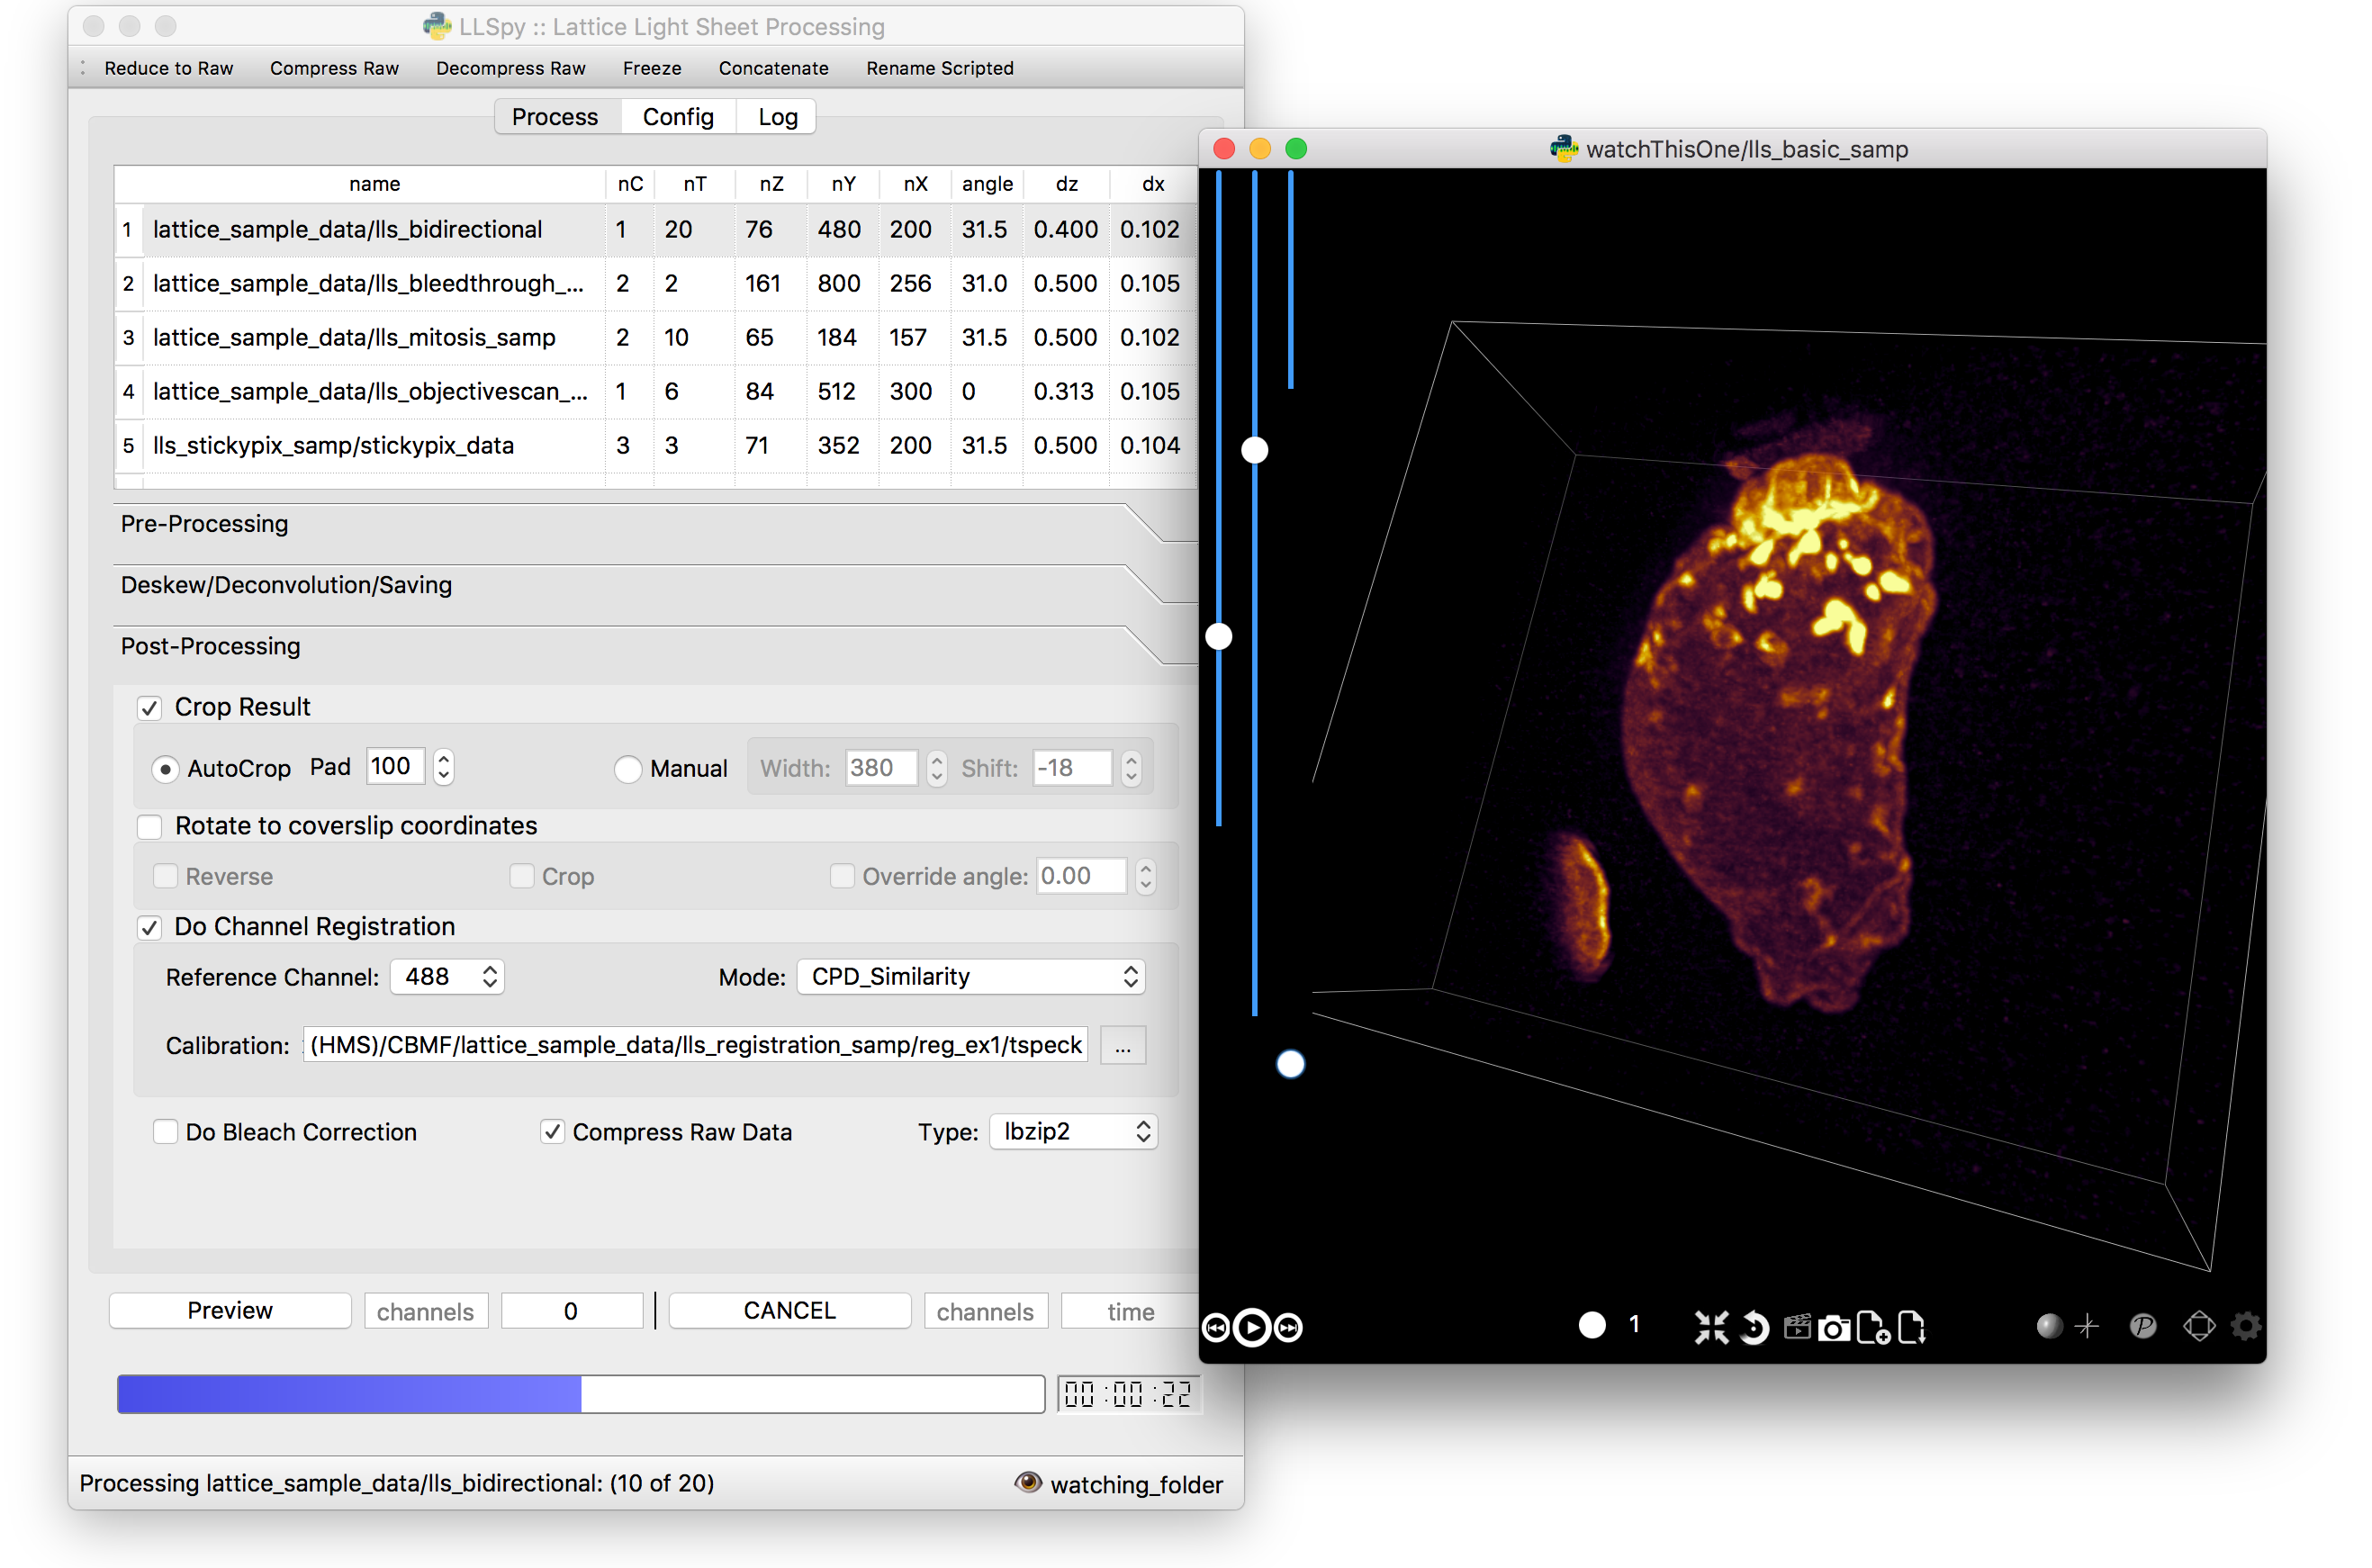
The GUI provides access to the majority of functionality in LLSpy. It includes a drag-and drop queue, visual progress indicator, and the ability to preview data processed with the current settings using the (awesome) 4D-viewer, Spimagine developed by Martin Weigert in the Myers lab at MPI-CBG. Support for online-processing with a “monitored folder” or real-time visualization with Spimagine is in development.
GUI documentation here.
2. Command Line Interface
The command line interface can be used to process LLS data in a server environment (linux compatible).
$ lls --help

Usage: lls [OPTIONS] COMMAND [ARGS]...

  LLSpy

  This is the command line interface for the LLSpy library, to facilitate
  processing of lattice light sheet data using cudaDeconv and other tools.

Options:
  --version          Show the version and exit.
  -c, --config PATH  Config file to use instead of the system config.
  --debug
  -h, --help         Show this message and exit.

Commands:
  camera    Camera correction calibration
  clean     Delete LLSpy logs and preferences
  compress  Compression & decompression of LLSdir
  config    Manipulate the system configuration for LLSpy
  decon     Deskew and deconvolve data in LLSDIR.
  deskew    Deskewing only (no decon) of LLS data
  gui       Launch LLSpy Graphical User Interface
  info      Get info on an LLSDIR.
  install   Install cudaDeconv libraries and binaries
  reg       Channel registration

# process a dataset
$ lls decon --iters 8 --correctFlash /path/to/dataset

# change system or user-specific configuration
$ lls config --set otfDir path/to/PSF_and_OTFs

# or launch the gui
$ lls gui
Command line documentation here.
3. Interactive data processing in a python console
 >>> import llspy

 # the LLSdir object contains most of the useful attributes and
 # methods for interacting with a data folder containing LLS tiffs
 >>> E = llspy.LLSdir('path/to/experiment_directory')
 # it parses the settings file into a dict:
 >>> E.settings
 {'acq_mode': 'Z stack',
  'basename': 'cell1_Settings.txt',
  'camera': {'cam2name': '"Disabled"',
             'cycle': '0.01130',
             'cycleHz': '88.47 Hz',
             'exp': '0.01002',
     ...
 }

 # many important attributes are in the parameters dict
 >>> E.parameters
 {'angle': 31.5,
  'dx': 0.1019,
  'dz': 0.5,
  'nc': 2,
  'nt': 10,
  'nz': 65,
  'samplescan': True,
   ...
 }

 # and provides methods for processing the data
 >>> E.autoprocess()

 # the autoprocess method accepts many options as keyword aruguments
 # a full list with descriptions can be seen here:
 >>> llspy.printOptions()

               Name  Default                    Description
               ----  -------                    -----------
       correctFlash  False                      do Flash residual correction
 flashCorrectTarget  cpu                        {"cpu", "cuda", "parallel"} for FlashCor
             nIters  10                         deconvolution iters
          mergeMIPs  True                       do MIP merge into single file (decon)
             otfDir  None                       directory to look in for PSFs/OTFs
             tRange  None                       time range to process (None means all)
             cRange  None                       channel range to process (None means all)
                ...  ...                        ...

# as well as file handling routines
>>> E.compress(compression='lbzip2')  # compress the raw data into .tar.(bz2|gz)
>>> E.decompress()  # decompress files for re-processing
>>> E.freeze()  # delete all processed data and compress raw data for long-term storage.
API documentation here.
Features of LLSpy
- graphical user interface with persistent/saveable processing settings
- command line interface for remote/server usage (coming)
- preview processed image to verify settings prior to processing full experiment
- Pre-processing corrections:
- correct “residual electron” issue on Flash4.0 when using overlap synchronous mode. Includes CUDA and parallel CPU processing as well as GUI for generation of calibration file.
- apply selective median filter to particularly noisy pixels
- trim image edges prior to deskewing (helps with CMOS edge row artifacts)
- auto-detect background
- Processing:
- select subset of acquired images (C or T) for processing
- automatic parameter detection based on auto-parsing of Settings.txt
- automatic OTF generation/selection from folder of raw PSF files, based on date of acquisition, mask used (if entered into SPIMProject.ini), and wavelength.
- graphical progress bar and time estimation
- Post-processing:
- proper voxel-size metadata embedding (newer version of Cimg)
- join MIP files into single hyperstack viewable in ImageJ/Fiji
- automatic width/shift selection based on image content (“auto crop to features”)
- automatic fiducial-based image registration (provided tetraspeck bead stack)
- compress raw data after processing
- Watched-folder autoprocessing (experimental):
- Server mode: designate a folder to watch for incoming finished LLS folders (with Settings.txt file). When new folders are detected, they are added to the processing queue and the queue is started if not already in progress.
- Aquisition mode: designed to be used on the aquisition computer. Designate folder to watch for new LLS folders, and process new files as they arrive. Similar to built in GPU processing tab in Lattice Scope software, but with the addition of all the corrections and parameter selection in the GUI.
- easily return LLS folder to original (pre-processed) state
- compress and decompress folders and subfolders with lbzip2 (not working on windows)
- concatenate two experiments - renaming files with updated relative timestamps and stack numbers
- rename files acquired in script-editor mode with
Iter_in the name to match standard naming with positions (work in progress) - cross-platform: includes precompiled binaries and shared libraries that should work on all systems.
Requirements
- Compatible with Windows (tested on 7/10), Mac or Linux (tested on Ubuntu 16.04)
- Python 3.6 (recommended), 3.5, or 2.7
- Most functionality assumes a data folder structure as generated by the Lattice Scope LabeView acquisition software written by Dan Milkie in the Betzig lab. If you are using different acquisition software, it is likely that you will need to change the data structure and metadata parsing routines.
- Currently, the core deskew/deconvolution processing is based on cudaDeconv, written by Lin Shao and maintained by Dan Milkie. cudaDeconv is licensed and distributed by HHMI. It is not included in this repository and must be acquired seperately in the dropbox share accessible after signing the RLA with HHMI. Contact innovation@janlia.hhmi.org.
- CudaDeconv requires a CUDA-capable GPU
- The Spimagine viewer requires a working OpenCL environment
Installation
Note: As of version 0.4.2 cudaDecon is now included in the LLSpy conda package and requires no additional steps for installation. Horray for open source!
Launch a
terminalwindow (OS X, Linux), orAnaconda Prompt(Windows)Add the “conda-forge” and “talley” channels to your conda config
$ conda config --add channels conda-forge
$ conda config --add channels talley
Install LLSpy into a new conda environment
$ conda create -n llsenv python=3.6 llspy
$ conda activate llsenv
The
create -n llsenvline creates a virtual environment. This is optional, but recommended as it easier to uninstall cleanly and prevents conflicts with any other python environments. If installing into a virtual environment, you must source the environment before proceeding, and each time before using llspy.
Each time you use the program, you will need to activate the virtual environment. The main command line interface is lls, and the gui can be launched with lls gui. You can create a bash script or batch file to autoload the environment and launch the program if desired.
# Launch Anaconda Prompt and type...
$ conda activate llsenv

# show the command line interface help menu
$ lls -h
# process a dataset
$ lls decon /path/to/dataset
# or launch the gui
$ lls gui
Setup
There are a few things that must be configured properly in order for LLSpy to work.
OTF Directory
Important
LLSpy is currently limited to PSF/OTF files that were acquired in galvo/objective scanning mode, using a 0.1µm Z step size. This assumption is made both during generation of OTFs from PSF files in the OTF directory, and during deconvolution made with pre-generated OTF files. So even if you have made OTF files manually (using, for example, radialft), the voxel size must still be 0.1µm. This is a limitation that will eventually be fixed, but feel free to raise a github issue if you require this flexibility.
LLSpy assumes that you have a directory somewhere with all of your PSF and OTF
files. You must enter this directory on the config tab of the LLSpy gui or by
using lls config --set otfDir PATH in the command line interface.
The simplest setup is to create a directory and include an OTF for each wavelength you wish to process, for instance:
/home/myOTFs/
├── 405_otf.tif
├── 488_otf.tif
├── 560_otf.tif
├── 642_otf.tif
The number in the filenames comes from the wavelength of the laser used for
that channel. This is parsed directly from the filenames, which in turn are
generated based on the name of the laser lines specified in the SPIMProject
AOTF.mcf file in the SPIM Support Files directory of the Lattice Scope
software. For instance, if an AOTF channel is named “488nm-SB”, then an
example file generated with that wavelength might be called:
cell5_ch0_stack0000_488nm-SB_0000000msec_0020931273msecAbs.tif
The parsed wavelength will be the digits only from the segment between the stack number and the relative timestamp. In this case: “488nm-SB” –> “488”. For more detail on filename parsing see filename parsing below.
As a convenience, you can also place raw PSF files in this directory with the following naming convention:
[date]_[wave]_[slm_pattern]_[outerNA]-[innerNA].tif
… where outerNA and innerNA use ‘p’ instead of decimal points, for
instance:
20160825_488_square_0p5-0p42.tif
the actual regex that parses the OTF is as follows
psffile_pattern = re.compile(
    r"""
    ^(?P<date>\d{6}|\d{8})      # 6 or 8 digit date
    _(?P<wave>\d+)              # wavelength ... only digits following _ are used
    _(?P<slmpattern>[a-zA-Z_]+)  # slm pattern
    _(?P<outerNA>[0-9p.]+)      # outer NA, digits with . or p for decimal
    [-_](?P<innerNA>[0-9p.]+)   # inter NA, digits with . or p for decimal
    (?P<isotf>_otf)?.tif$""",  # optional _otf to specify that it is already an otf
    re.VERBOSE,
)
If the SPIMProject.ini file also contains information about the
[Annular Mask] pattern being used (as demonstrated below), then LLSpy will
try to find the PSF in the OTF directory that most closely matches the date of
acquisition of the data, and the annular mask pattern used, and generate an OTF
from that file that will be used for deconvolution.
[Annular Mask]
outerNA = 0.5
innerNA = 0.42
How does LLSpy pick the OTF to use?
When deconvolving a given file, LLSpy follows this sequence when deciding which OTF file to use:
- Checks to make sure there is at least one PSF/OTF in the otfDir with a wavelength within a few nanometers of the current wavelength.
- Then, if the
[Annular Mask]setting is present in settings.txt, LLSpy will look for a PSF/OTF matching the mask and wavelength of the current file, using the PSF from the date closest to the experiment, as a tie breaker. - If mask parameters have not been provided, or if there is no OTF/PSF
matching the particular mask/wavelength of the current file, then it falls
back to looking for a “default OTF”, which is named something like
488_otf.tifor`488_psf.tif. - Finally, if the file is a PSF file, and not an OTF file, then an OTF will be generated and used.
Flash4.0 Calibration
In order to take advantage of the Flash synchronous trigger mode correction
included in LLSpy, you must first characterize your camera by collecting a
calibration dataset as described in LLSpy Camera Corrections, then direct LLSpy to that
file on the Config Tab of the GUI, or using lls config --set camparamsPath
PATH in the command line interface. Support for more than one camera is in
development.
Channel Registration
Transformation matrices for registering multichannel datasets can be generated using a calibration dataset of multi-color fiducials such as tetraspeck beads. The path to this dataset must be provided to LLSpy in the Post-Processing tab. See more in the section on Introduction to Channel Registration.
Data Structure Assumptions
I have made a number of assumptions about the structure of the data folder being processed with LLSpy. If you organize your data different than I have, it may cause unexpected results or bugs. It’s likely that these problems can be fixed, so if your data organization conventions differ from those described below, just submit an issue on github describing the problem or contact Talley with an example of your data folder format.
The main object in LLSpy is the llspy.llsdir.LLSdir “data folder” object (see Developer Interface). This object assumes that each experiment (e.g. single multi-channel timelapse) is contained in a single folder, with all of the raw tiffs, and one *Settings.txt file. A typical LLSdir folder structure might look like this:
/lls_experiment_1/
├── cell5_ch0_stack0000_488nm_0000000msec_0020931273msecAbs.tif
├── cell5_ch0_stack0001_488nm_0000880msec_0020932153msecAbs.tif
├── cell5_ch0_stack0002_488nm_0001760msec_0020933033msecAbs.tif
├── cell5_ch1_stack0000_560nm_0000000msec_0020931273msecAbs.tif
├── cell5_ch1_stack0001_560nm_0000880msec_0020932153msecAbs.tif
├── cell5_ch1_stack0002_560nm_0001760msec_0020933033msecAbs.tif
├── cell5_Settings.txt
Filename Parsing
In order to perform many of the automated functions that LLSpy performs, it is necessary to extract information from the filename, such as the channel, wavelength, timepoint, etc… If this step is unsuccessful, many things will break.
Prior to version 0.3.9, LLSpy assumed that you are using the file naming convention used by Dan Milkie’s Labview acquisition software, and filenames were parsed according to the following regular expression.
filename_pattern = re.compile(r"""
  ^(?P<basename>.+)        # any characters before _ch are basename
  _ch(?P<channel>\d)       # channel is a single digit following _ch
  _stack(?P<stack>\d{4})   # timepoint is 4 digits following _stack
  _\D*(?P<wave>\d+).*      # wave = contiguous digits in this section
  _(?P<reltime>\d{7})msec  # 7 digits after _ and before msec
  _(?P<abstime>\d{10})msecAbs # 10 digits after _ and before msecAbs
  """, re.VERBOSE)
As of version 0.3.9, LLSpy allows the user to define a filename pattern using relatively simple syntax (thanks to the parse library). The filename pattern can be changed in the config tab. The default pattern, which should work for the original Lattice Scope software released by Dan Milkie is as follows:
{basename}_ch{channel:d}_stack{stack:d}_{wave:d}nm_{reltime:d}msec_{abstime:d}msecAbs
The syntax for the filename pattern is as follows:
- Anything inside of brackets
{}is a placeholder - Anthing NOT inside of a bracket is taken as a literal/constant that will be present in the filename (such as “_stack” or “_ch”).
- Words inside of brackets (e.g.
{basename}) specify the variable that placeholder represents. - The variable names recognized by LLSpy are as follows (note, required variables must be present in your filename pattern):
basename(required)channel:d(required)stack:d(required)wave:d(required)reltime:dabstime:d
- a colon folowed by the letter d (e.g.
{wave:d}) specifies that the variable is an integer (:dmust be used for the channel, stack, and wave variables and any other number variables) - an empty bracket
{}can be used as a “wildcard” to consume any text in the name that may be causing difficulty with filename parsing, LLSpy will simply ignore it. LLSpy adds a{}to all filename patterns (which means, for example, that it is not necessary to include the ‘.tif’ at the end of the filename pattern)
If you are struggling with filename parsing or data structure issues, please submit an issue on github and include details on your filename patterns and data structure.
Script-editor datasets
There is basic (but experimental) support for multi-point experiments that have been acquired using the Script Editor in the Lattice Scope software. Here a typical experimental folder might look like this:
/lls_multipoint_samp/
├── looptest_Iter_0_ch0_stack0000_488nm_0000000msec_0006417513msecAbs.tif
├── looptest_Iter_0_ch0_stack0000_488nm_0000000msec_0006419755msecAbs.tif
├── looptest_Iter_0_ch1_stack0000_560nm_0000000msec_0006417513msecAbs.tif
├── looptest_Iter_0_ch1_stack0000_560nm_0000000msec_0006419755msecAbs.tif
├── looptest_Iter_0_Settings.txt
├── looptest_Iter_1_ch0_stack0000_488nm_0000000msec_0006429124msecAbs.tif
├── looptest_Iter_1_ch0_stack0000_488nm_0000000msec_0006431503msecAbs.tif
├── looptest_Iter_1_ch1_stack0000_560nm_0000000msec_0006429124msecAbs.tif
├── looptest_Iter_1_ch1_stack0000_560nm_0000000msec_0006431503msecAbs.tif
├── looptest_Iter_1_Settings.txt
You can use the llspy.llsdir.rename_iters() function on this folder, or the Rename Scripted tool in the LLSpy GUI to convert this folder to multiple standard LLSdirs. The result be something like this:
/lls_multipoint_samp/
├── /looptest_pos00/
|   ├── looptest_pos00_ch0_stack0000_488nm_0000000msec_0006417513msecAbs.tif
|   ├── looptest_pos00_ch0_stack0001_488nm_0011611msec_0006429124msecAbs.tif
|   ├── looptest_pos00_ch1_stack0000_560nm_0000000msec_0006417513msecAbs.tif
|   ├── looptest_pos00_ch1_stack0001_560nm_0011611msec_0006429124msecAbs.tif
|   ├── looptest_pos00_Settings.txt
├── /looptest_pos01/
|   ├── looptest_pos01_ch0_stack0000_488nm_0000000msec_0006419755msecAbs.tif
|   ├── looptest_pos01_ch0_stack0001_488nm_0011748msec_0006431503msecAbs.tif
|   ├── looptest_pos01_ch1_stack0000_560nm_0000000msec_0006419755msecAbs.tif
|   ├── looptest_pos01_ch1_stack0001_560nm_0011748msec_0006431503msecAbs.tif
|   ├── looptest_pos01_Settings.txt
Known Issues & Bug Reports
- on spimagine preview, openGL error on some windows 10 computers
- backgrounds on vertical sliders on spimagine viewer are screwed up
- When unexpected errors occur mid-processing, sometimes the “cancel” button does nothing, forcing a restart.
- when loading regDir with cloud.json, it doesnt load images, and if you try to show
an image with something like
rd.cs.show_matchingyou get an errorAttributeError: 'FiducialCloud' object has no attribute 'max'
Bug reports are very much appreciated: Contact Talley
Please include the following in any bug reports:
- Operating system version
- GPU model
- CUDA version (type
nvcc --versionat command line prompt) - Python version (type
python --versionat command line prompt, withllsenvconda environment active if applicable)